Since it's been roughly a year since I booked any gigs, and even longer than that since I've gone out looking for photography work, I figured I'd close up shop (possibly for good) and concentrate on the things that really matter. My wife, my profession, and my sanity.
I've always said that once the side gig started feeling like work, I'd be done. It's felt more like work than ever. My newish "real" job makes more frequent demands of my weekend time, which means I'm even more protective of my down time now.
On the plus side, my last wedding was as a second shooter for a good friend, and the wedding party was amazing. It was a helluva way to go out on a good note.
I may update this blog occasionally with some of the personal work I do. I still have cameras, I still like making pictures, and I'm still narcissistic enough to want to show people things I think I've done well. There's also a new motorcycle in the picture, and I'll bet it's going to take me to locations that I'd love to get on camera.
Until then...
12 July 2014
18 October 2012
Gear Review - Canon 5D Mark III with EF 24-105 f/4L
What have I done?
I rented some gear for an upcoming wedding, because it's an evening wedding in the fall, and my old backup body just doesn't handle low-light very well. My main body, the 60D does a great job, and when it can't handle it on its own, Lightroom picks up the slack. It's been working out well for me, but, if the 60D picks that night to have a fit, I would have been in a lurch. Enter the Canon 5D Mark III, and its (arguably) most commonly-paired lens, the EF 24-105 f/4L IS.
I was really hoping to be underwhelmed by this combination of body and lens. I was kind of hoping I'd put it through its paces and say "Yeah - nice camera, but, it's not worth four thousand dollars." (Just typing that number made me blink, and hard).
I was wrong. It's worth it. The 60D is amazing up to ISO 1600, great at 3200, and salvageable at 6400. I don't run it higher than that, because it's not worth presenting the pictures to a client. In a "gotta get that shot" type of situation, I'd bump it up to 12,800 and hope for the best, but, not at a paying gig.
The following shots have had work in Lightroom done to them - why not, since I'll be doing it anyway?
ISO 6400:
This shot was taken at ISO 102,400 (Read that again, it's not a typo)
You know what? I can work with that. It needs color work done, or it might get converted to Black and White, but it's usable. At 102,400.
Here's a different shot, taken at ISO 12,800 (an ISO that I would not use on my 60D):
I wouldn't lose any sleep over giving that to a client. It's clean, it doesn't have any noise, and, as long as they're not planning on making a massive print out of it, it's roughly a Brazilian times better than most of the camera-phone shots that populate social media.
Speaking of social media, I shot a few new timeline covers with this, purely to test it out:
And, a shot processed by giving it a gritty feel:
Let's keep this all between you and me, though, OK? I've got to figure out a good way to let my wife know that I'm planning on buying a camera that cost more than my motorcycle.
19 March 2012
Roadtrip - Centralia Part II - Mine Fire Boogaloo
As promised, I'm pleased to present Part II of the exciting tale that chronicles one small group's visit to Centralia.
After we had out fill of windmills, we boogied on down to Centralia proper. It's easy to miss these days. The DEP (or vandals) have removed the signage at the entrance to Old 61 informing intrepid tourists that they're in grave peril due to "Dangerous Gases" and/or "Sudden Ground Collapse" (Taken almost 6 years ago, on a previous trip):

Instead, in front of the large mound of dirt they placed at the entrance to Old 61, they deposited...another large mound of dirt. I don't have a shot of it, but really, it's a mound of dirt. Not that exciting. Moving on...
We parked to the side of the large dirt mound, I grabbed my camera, and we walked up onto Old 61.
Six years ago, when we visited Centralia, we had the old highway to ourselves. Not so this time. The unseasonably warm weather had something to do with it, I'm sure, but, even though there's a mine fire burning beneath the town and highway, the atmosphere was more Magic Kingdom than Mordor. There were folks on ATVs, families with young children, couples walking hand-in-hand with Fido along side. It was a beautiful day for a hike.
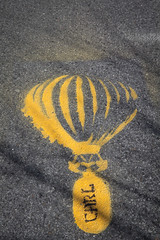
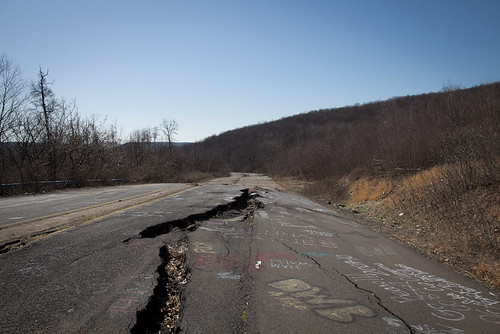
We walked the entire length of the old highway, from one dirt mount to another. Six years ago, there was some graffiti; there's more this time, and it's generally of a much higher quality:
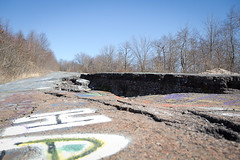
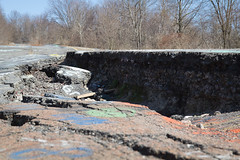
The massive crack in the road is also much more massive:
After we made it up to the top, we walked back down to the truck to bring it with us into the town proper. At this point, I should mention that there are two ways to get into Centralia from where the truck was parked. There's "New" 61, which routes around the DMZ that is "Old" 61, and there's "Old" 61, which is protected on both sides by large berms. Last fall, I traded in the Mighty Hyundai for a Toyoya FJ Cruiser, Trail Teams Edition. It's got big all-terrains on it, skid plates covering (most of) the important bits, ten inches of clearance, nine inches of articulation, and pretty steep approach, departure, and breakover angles (34 degrees, 30 degrees, and 27.4 degrees, respectively). Toss in a very capable four-wheel drive system, locking rear differential, Toyota's acclaimed A-TRAC system, and a spotter shooting video (Thanks, Wallio!), and there was no way I wasn't going over "Old" 61.
The trip up the berm was uneventful, and pulling back onto "New" 61 at the other end went without incident. We did get some looks (and waves) from the folks on ATVs and dirt bikes, but it was fun.
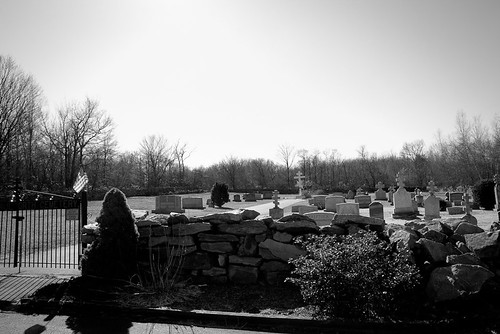
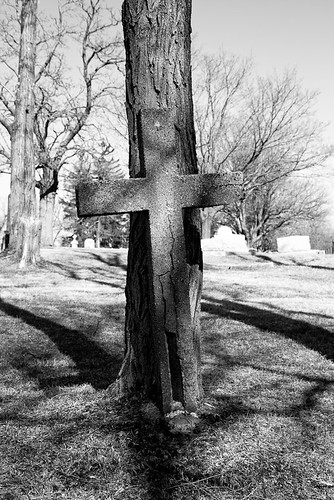
We parked outside the SS Peter and Paul Cemetery, and took a few shots of the surroundings.
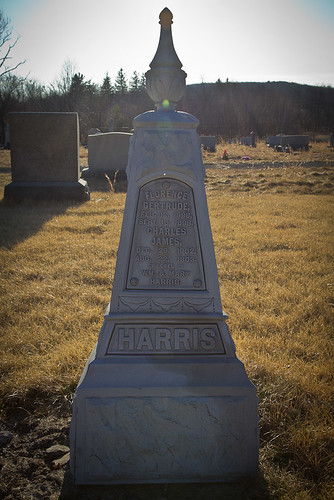
Followed that up with a walk through the SS Peter and Paul Cemetery:
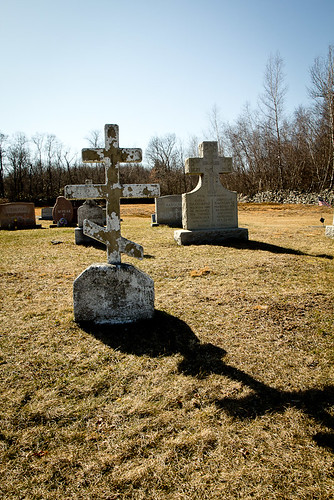
And then a walk to the St. Ignatious Cemetery:
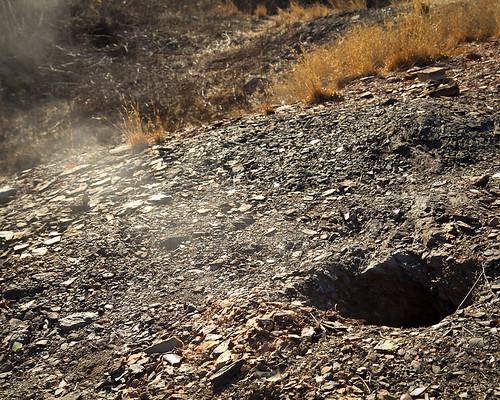
It was time to do a bit more exploring. We took the FJ up a hill that clearly had smoke coming out:
A bit more light off-roading and it was time for lunch, and a pee-break. We headed to Ashland (the closest populated town) and used the facilities in a Turkey Hill. On the way back to Centralia, I spotted this:
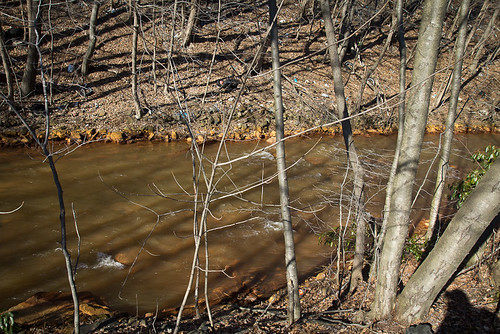
That is a stream with the banks stained orange from mine runoff. On the way back up from taking the shot, I stepped in something that puffed up a cloud of stench, and made me sneeze. I've probably got some form of mine-fire-related Ebola right now, but, so far, I feel fine.
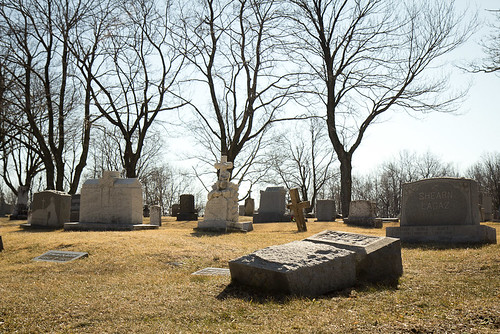
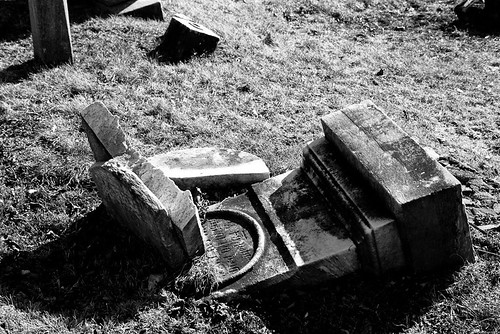
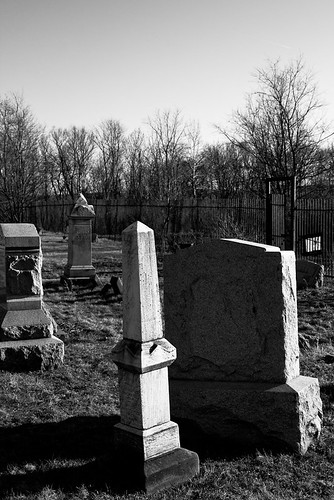
We parked by the Odd Fellows cemetery, passed a few words with some tourists, and one local, and had lunch. There was an aborted attempted at some additional off-roading, but the ridiculously steep approach and the "No Trespassing" signs were a sufficient deterrent. Instead, we took a walk around the Odd Fellows cemetery:
We wrapped it up after that, and headed back to Drums for some frosty beverages and a little NHRA Drag Racing.
After we had out fill of windmills, we boogied on down to Centralia proper. It's easy to miss these days. The DEP (or vandals) have removed the signage at the entrance to Old 61 informing intrepid tourists that they're in grave peril due to "Dangerous Gases" and/or "Sudden Ground Collapse" (Taken almost 6 years ago, on a previous trip):

Instead, in front of the large mound of dirt they placed at the entrance to Old 61, they deposited...another large mound of dirt. I don't have a shot of it, but really, it's a mound of dirt. Not that exciting. Moving on...
We parked to the side of the large dirt mound, I grabbed my camera, and we walked up onto Old 61.
Six years ago, when we visited Centralia, we had the old highway to ourselves. Not so this time. The unseasonably warm weather had something to do with it, I'm sure, but, even though there's a mine fire burning beneath the town and highway, the atmosphere was more Magic Kingdom than Mordor. There were folks on ATVs, families with young children, couples walking hand-in-hand with Fido along side. It was a beautiful day for a hike.
We walked the entire length of the old highway, from one dirt mount to another. Six years ago, there was some graffiti; there's more this time, and it's generally of a much higher quality:
The massive crack in the road is also much more massive:
After we made it up to the top, we walked back down to the truck to bring it with us into the town proper. At this point, I should mention that there are two ways to get into Centralia from where the truck was parked. There's "New" 61, which routes around the DMZ that is "Old" 61, and there's "Old" 61, which is protected on both sides by large berms. Last fall, I traded in the Mighty Hyundai for a Toyoya FJ Cruiser, Trail Teams Edition. It's got big all-terrains on it, skid plates covering (most of) the important bits, ten inches of clearance, nine inches of articulation, and pretty steep approach, departure, and breakover angles (34 degrees, 30 degrees, and 27.4 degrees, respectively). Toss in a very capable four-wheel drive system, locking rear differential, Toyota's acclaimed A-TRAC system, and a spotter shooting video (Thanks, Wallio!), and there was no way I wasn't going over "Old" 61.
The trip up the berm was uneventful, and pulling back onto "New" 61 at the other end went without incident. We did get some looks (and waves) from the folks on ATVs and dirt bikes, but it was fun.
We parked outside the SS Peter and Paul Cemetery, and took a few shots of the surroundings.
Followed that up with a walk through the SS Peter and Paul Cemetery:
And then a walk to the St. Ignatious Cemetery:
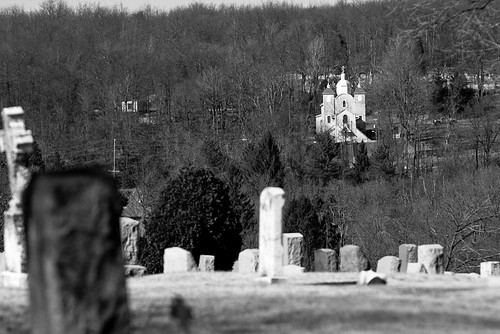 |
| The Assumption of the Blessed Virgin Mary Church in the background |
It was time to do a bit more exploring. We took the FJ up a hill that clearly had smoke coming out:
A bit more light off-roading and it was time for lunch, and a pee-break. We headed to Ashland (the closest populated town) and used the facilities in a Turkey Hill. On the way back to Centralia, I spotted this:
That is a stream with the banks stained orange from mine runoff. On the way back up from taking the shot, I stepped in something that puffed up a cloud of stench, and made me sneeze. I've probably got some form of mine-fire-related Ebola right now, but, so far, I feel fine.
We parked by the Odd Fellows cemetery, passed a few words with some tourists, and one local, and had lunch. There was an aborted attempted at some additional off-roading, but the ridiculously steep approach and the "No Trespassing" signs were a sufficient deterrent. Instead, we took a walk around the Odd Fellows cemetery:
 |
| Zinc tombstone - (Hat Tip to The Missus, for pointing it out) |
We wrapped it up after that, and headed back to Drums for some frosty beverages and a little NHRA Drag Racing.
17 March 2012
Roadtrip - Centralia Part I - Windmills
Last week The Missus and I went on a little road-trip with some friends. We took the FJ to Centralia for some history, photography, and a bit of off-roading.
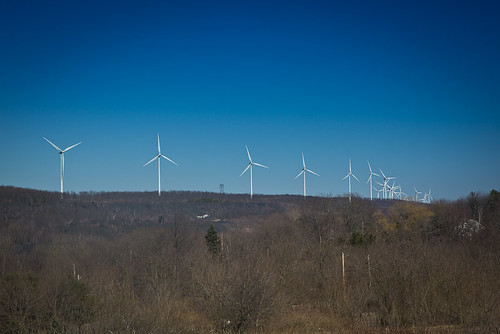
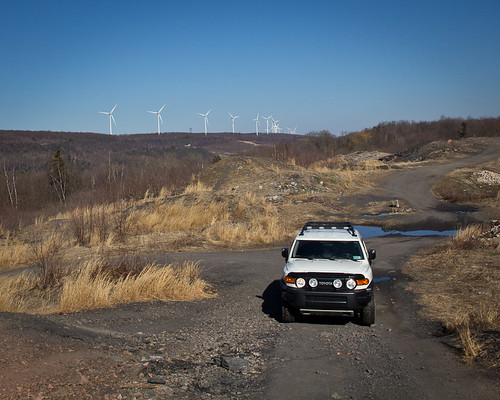
We missed a turn en route to our destination. As the four of us crested a hill, we found ourselves eye-level with one of these:
A collective, respectful "daaaamn" went up from the crowd.
After some additional driving, and assurances that I would make sure to stop by here on the way back from Centralia, my ADD-like inclinations got the best of me, and I swung the rig around, headed back for the windmills, and found a good place to park.
Surprisingly, access to the site was simple, and, apparently, not discouraged. I looked for, but did not find, any signs prohibiting our presence. There were a handful of warning signs indicating that high voltage was present, and I'm certain there were cameras to observe our activities; the site seemed very photographer-friendly.
The first thing that struck me was the sound. The blades appeared to be moving at a deceptively leisurely pace, but the "frwwrrzz" of displaced air as each blade came arcing toward the ground was eerie, I've tried to document it with a short video:
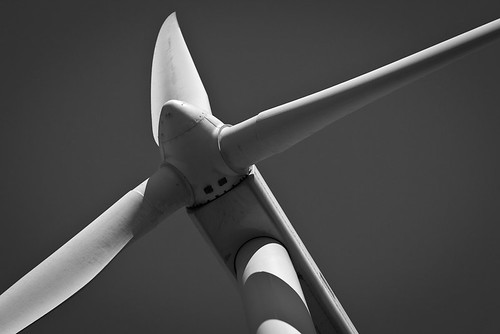
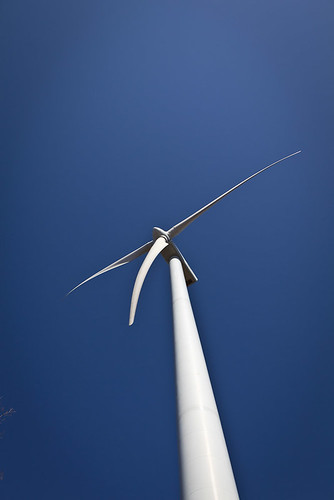
Beyond that, the mere scale of these windmills was impressive. You understand, at a purely intellectual level, that machines like this are large. They're visible from miles away. You don't really get to appreciate them on gut level until you stand at the base and look up:
I can't easily quantify how many feet above us the hub was, but a fact sheet on this model of windmill puts it about 250 feet above us. I'll buy that.
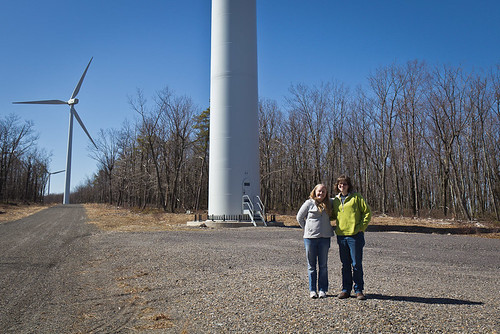
We took a few more shots, got a few more minutes of video, and finished up with a shot of The Missus and Annie before heading down in Centralia:
I'll cover the actual Centralia portion of the trip in "Centralia Part II - Mine Fire Boogaloo".
We missed a turn en route to our destination. As the four of us crested a hill, we found ourselves eye-level with one of these:
A collective, respectful "daaaamn" went up from the crowd.
After some additional driving, and assurances that I would make sure to stop by here on the way back from Centralia, my ADD-like inclinations got the best of me, and I swung the rig around, headed back for the windmills, and found a good place to park.
Surprisingly, access to the site was simple, and, apparently, not discouraged. I looked for, but did not find, any signs prohibiting our presence. There were a handful of warning signs indicating that high voltage was present, and I'm certain there were cameras to observe our activities; the site seemed very photographer-friendly.
The first thing that struck me was the sound. The blades appeared to be moving at a deceptively leisurely pace, but the "frwwrrzz" of displaced air as each blade came arcing toward the ground was eerie, I've tried to document it with a short video:
Beyond that, the mere scale of these windmills was impressive. You understand, at a purely intellectual level, that machines like this are large. They're visible from miles away. You don't really get to appreciate them on gut level until you stand at the base and look up:
I can't easily quantify how many feet above us the hub was, but a fact sheet on this model of windmill puts it about 250 feet above us. I'll buy that.
We took a few more shots, got a few more minutes of video, and finished up with a shot of The Missus and Annie before heading down in Centralia:
I'll cover the actual Centralia portion of the trip in "Centralia Part II - Mine Fire Boogaloo".
05 February 2012
POTW 2012 - Week 5 - Sweets
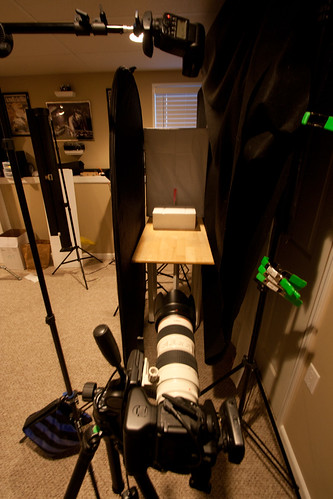
Not all that much to say about this week's shot, except I wanted a subject that I could light through. This fit the bill nicely:
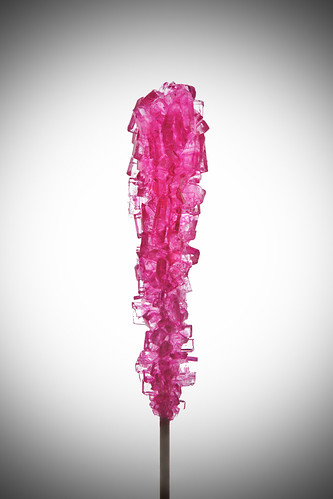
Rock candy, FTW!
Setup is light behind the subject, in the form of a small softbox, with a bare speedlight hitting the candy head-on, to light up the stick a little bit.
To either side of the subject are black flags, to give the edges some definition.
200mm (320mm APS-C equivalent) at ISO 100, 1/250, and f/11. The light at the back is set at around half-power, the speedlight is set to 1/16.
The setup looks like this:
One of the advantages to this shooting style, where the background is completely blown out is recomposing in post is easy. Extend your canvas, fill it with white, and drop the shot where you want it. No extracting necessary.
I added the vignette in post, and it's the first step toward turning this shot into a retro candy advertisement.
28 January 2012
POTW2012 - Week 4 - Shadow
My intent for this week's theme dovetailed nicely with my intent to try stand developing for the first time.
Stand (or, in this case, semi-stand) development uses a very dilute developing solution, and very little agitation. It's used as a compensating development method to bring out shadow detail and increase apparent dynamic range. By letting the film sit undisturbed, the highlight areas develop quickly, but exhaust the developer touching them just as quickly. The shadow areas develop much more slowly, and can sit undisturbed for long periods of time without depleting the active developer. In this way, your highlights don't blow out, but you can still see details in the shadows. It's one part exposure, by exposing correctly for the shadows, one part developing, and three parts patience. Letting a roll of film sit in the tank for forty minutes, only agitating once at the beginning and once halfway through was a new one for me.
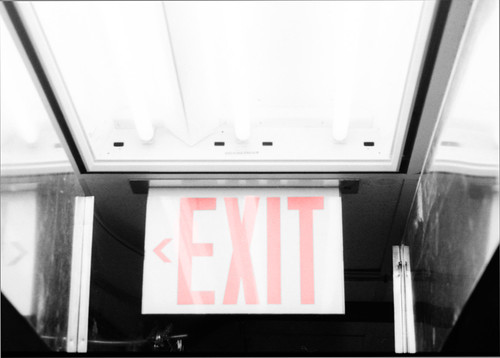
I will point out that I don't think I was completely successful - the highlight areas in image below are, obviously, not blown out, as there's quite a bit of detail in the light fixture. The shadowed areas, frankly, could be a bit darker. I did 'shop some color back into the image. It needed something, and the clearest picture I had in my head of this composition was the red "< EXIT" on the sign.
So, no setup here, film and all, but, this is my "recipe" if you will:
Exposed to put the shadows in Zone III (I metered on the ducts, to the bottom-left of the sign)
Developed in 600ml 68-degree water plus 6ml of HC-110.
One minute agitation, sit for 20 minutes, 15 seconds of agitation, sit for another 20 minutes.
2 minutes in the stop, constant agitation.
5 minutes in Kodak fixer, agitate for first 90 seconds, then 5 inversions every minute thereafter.
5 minutes in Hypo.
5 minute rinse, Photo-flo, 5 more minutes of rinsing
I wish I would have had my 60D with me, to get a comparison shot on digital. I'm fairly confident saying that if I had made the same shot, at the same settings, you would have seen the shadows, but the light fixture and surrounding ductwork would have been clipped.
Stand (or, in this case, semi-stand) development uses a very dilute developing solution, and very little agitation. It's used as a compensating development method to bring out shadow detail and increase apparent dynamic range. By letting the film sit undisturbed, the highlight areas develop quickly, but exhaust the developer touching them just as quickly. The shadow areas develop much more slowly, and can sit undisturbed for long periods of time without depleting the active developer. In this way, your highlights don't blow out, but you can still see details in the shadows. It's one part exposure, by exposing correctly for the shadows, one part developing, and three parts patience. Letting a roll of film sit in the tank for forty minutes, only agitating once at the beginning and once halfway through was a new one for me.
I will point out that I don't think I was completely successful - the highlight areas in image below are, obviously, not blown out, as there's quite a bit of detail in the light fixture. The shadowed areas, frankly, could be a bit darker. I did 'shop some color back into the image. It needed something, and the clearest picture I had in my head of this composition was the red "< EXIT" on the sign.
So, no setup here, film and all, but, this is my "recipe" if you will:
Exposed to put the shadows in Zone III (I metered on the ducts, to the bottom-left of the sign)
Developed in 600ml 68-degree water plus 6ml of HC-110.
One minute agitation, sit for 20 minutes, 15 seconds of agitation, sit for another 20 minutes.
2 minutes in the stop, constant agitation.
5 minutes in Kodak fixer, agitate for first 90 seconds, then 5 inversions every minute thereafter.
5 minutes in Hypo.
5 minute rinse, Photo-flo, 5 more minutes of rinsing
I wish I would have had my 60D with me, to get a comparison shot on digital. I'm fairly confident saying that if I had made the same shot, at the same settings, you would have seen the shadows, but the light fixture and surrounding ductwork would have been clipped.
16 January 2012
DIY Strip Lights
I've wanted strip lights for a while now, but the dang things are expensive, so I started in on a build to rig up a couple.
Here's what I used:
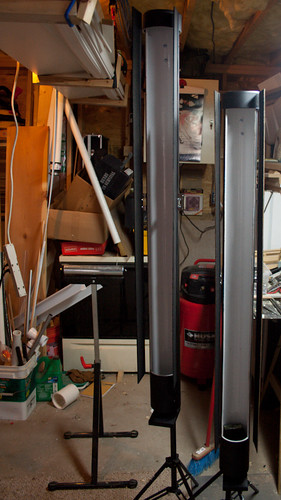
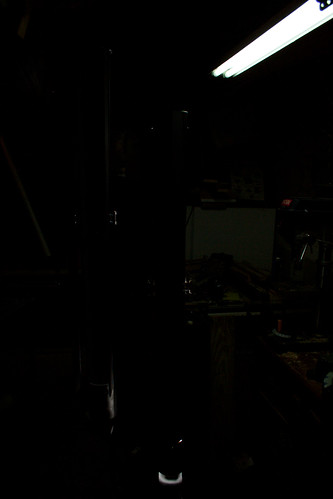
This is what they look like all done and whatnot:
Painted the insides gloss white, and the outsides and barndoors flat black.
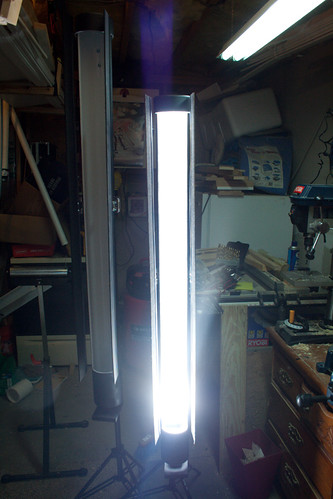
Popped the flash:
Some burn at the bottom, but it's much more even than my first test shots. I have some small convex mirrors on order that I'm going to mount in the cap to try to even things out a bit.
This is a shot with the barndoors partially closed:
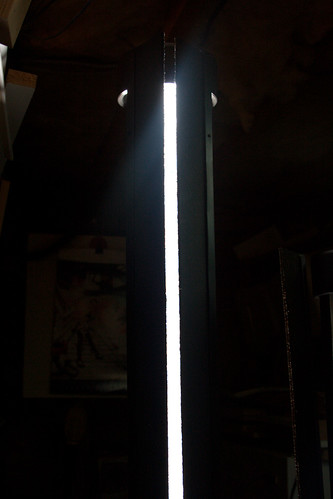
And, finally, a shot with the door closed completely:
Yes, the flash did fire - I'm pleased to see I have very little light leaking out.
Here's what I used:
- (2) 54" pieces of 4" PVC
- (2) 4" PVC Caps
- (2) 2" L-brackets
- (2) 4" L-brackets
- (4) Self-closing overlay hinges
- (2) 1/4"x20 wingnuts
- (1) 2' x 4' sheet of hardboard (clip board material) cut into 3" strips
- (8) 1/8" aluminum rivets with a 1/4" grab
- (16) Total feet of drop-ceiling L-channel
- Some wood
- Some screws
- Some nuts, bolts, and washers
This is what they look like all done and whatnot:
Painted the insides gloss white, and the outsides and barndoors flat black.
Popped the flash:
Some burn at the bottom, but it's much more even than my first test shots. I have some small convex mirrors on order that I'm going to mount in the cap to try to even things out a bit.
This is a shot with the barndoors partially closed:
And, finally, a shot with the door closed completely:
Yes, the flash did fire - I'm pleased to see I have very little light leaking out.
Subscribe to:
Comments (Atom)